My Tasks
 Overview
When you have many tasks, you need a way to see only the ones that matter. My Tasks offers a filter panel, a quick filter by due date and sorting from the column headers. Your choices are remembered, so the list looks the same when you come back. This article explains how filters combine, how sorting works, what exactly is remembered and where, and how to reset everything.
The filter panel
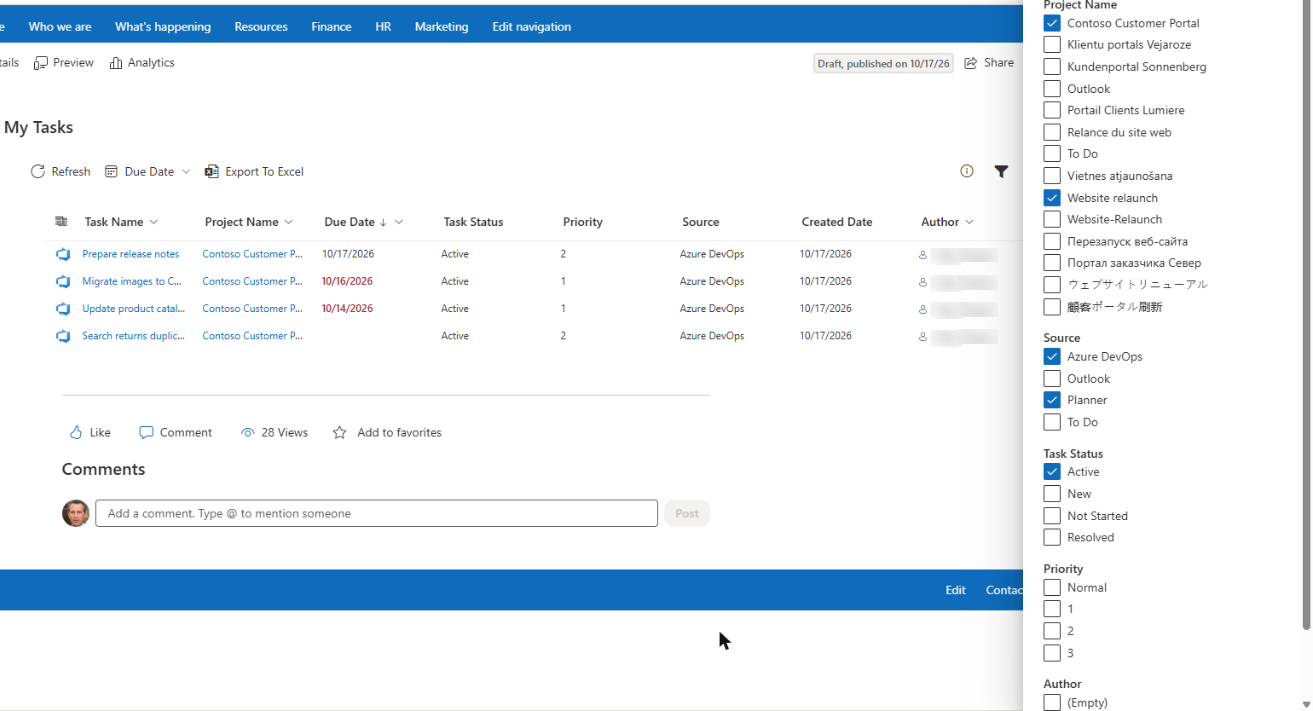
Click the Filter icon on the right side of the command bar. The Edit Filter Criteria panel opens beside the list. It contains five groups:
- Project Name
- Source
- Task Status
- Priority
- Author
Each group is a list of check boxes. The values are not typed in: they are collected automatically from the tasks that are loaded now. If you have Planner and To Do tasks only, the Source group offers only these two values. A task that has no value in a group is listed as (Empty).
There is no Apply button. The list changes as soon as you tick or untick a value, and the page navigator goes back to the first page. You can keep the panel open while you work with the list, and close it with the cross in the corner or by clicking outside of it. When at least one value is ticked, the Filter icon is shown filled, so you can see that the list is filtered.
How the filters combine
- Within one group the values are combined with OR. If you tick Planner and To Do in Source, you see tasks from Planner or To Do.
- Different groups are combined with AND. If you also tick In Progress in Task Status, you see only tasks that are from Planner or To Do and are in progress.
- A group where nothing is ticked is ignored.
- The Due Date menu in the command bar is one more condition with AND. See KB10292. My Tasks: Due Date Column, Overdue Highlighting and Quick Filters.
📝 Note
Tasks that have no author (To Do and Outlook tasks) are hidden as soon as you tick any value in the Author group, because these tasks cannot match a name. Untick the author to see them again.
Sorting
Sorting from a column header
Click a column header. A menu opens with two commands, Sort A to Z and Sort Z to A; a check mark shows the current direction. The list is re-sorted at once. For dates, A to Z means from the earliest to the latest date.
The menu is available in the columns Task Name, Project Name, Due Date and Author. The columns for the source icon, Created Date, Task Status, Priority, attachments and comments have no header menu, so you cannot sort by them from the page; use the filter panel to narrow the list by status or priority instead. The administrator can still make one of them the default sort order, as described below.
Sorting is applied to all the loaded tasks and then the list is divided into pages, so the first page always shows the first tasks in the chosen order.

The default sort order set by the administrator
In the web part settings, the administrator selects the default sorting in the group Sort by: the field (Task Name, Created Date, Due Date, Source, Priority or Task Status) and the direction (Sort A to Z or Sort Z to A). This order is what every user sees on the first visit. As soon as you choose your own sorting in a column header, your choice is remembered in your browser and used instead of the default. See KB10289. How to Add and Configure the My Tasks Web Part.
Personal view settings
My Tasks remembers the way you set up the list. These settings are saved:
| Setting | Remembered |
|---|---|
| Sorting | The column and the direction |
| Due date quick filter | The selected item of the Due Date menu |
| Filter panel | The ticked values in all groups |
When you open the page again, the web part applies them as soon as the tasks are loaded. The following is not remembered: the page you were on, the selected task and the open panels.
Where the settings are stored
The settings are saved in the local storage of your browser (localStorage). This has several consequences:
- They are stored separately for each browser and each device. If you sign in from another computer, from another browser or from the Teams app, you start with the default view there.
- They are stored separately for each My Tasks web part (each instance). Two web parts on different pages remember their own filters.
- They belong to you only. Other users, and the administrator, do not see them, and they are not sent to Vitextra or saved in Microsoft 365.
- They can disappear when you clear the browser data, and they may not be kept in a private (InPrivate or Incognito) window.
How to reset your view
- Click the Filter icon and untick all the values in all groups.
- Open the Due Date menu and choose All dates.
- If you want the default order back, clear the site data of your browser (see below). Sorting can otherwise be changed only by choosing another column or direction.
To reset everything in one step, clear the browser data for the SharePoint site: in your browser settings, open the site data or cookies section, find your tenant address (<tenant>.sharepoint.com) and remove the stored data. Be aware that this also signs you out of some sites and removes the saved settings of other SharePoint web parts.
❗ Important
If the list looks incomplete after you have returned to the page, an old filter may still be active. Check that the Filter icon is not filled and that the Due Date menu shows All dates. If tasks are still missing, see KB10307. Why Are My Tasks Missing or Not Loading?.
💡 Tip
Create your favorite view once, for example Due Date = This week, Source = Azure DevOps and sorting by Due Date, and it will be waiting for you every day. The export in KB10296. How to Export My Tasks to Excel saves exactly the tasks of your current view.